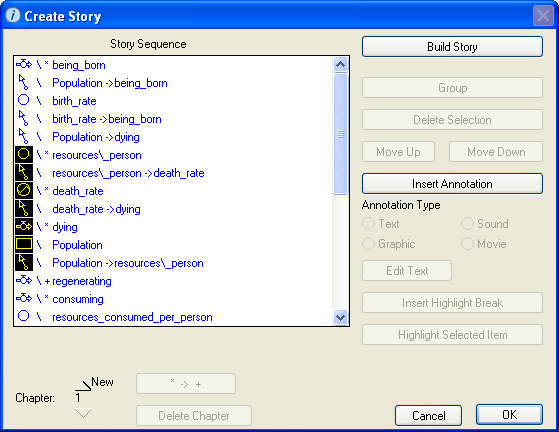
Use the Create Story dialog box to build a story for a storytelling button.
The story is initiated with a storytelling button on the Interface layer of your model.
To open this dialog box select the Storytelling option in the Button dialog box, and then click the Create Story or Edit Story button.

Displays a list of all items that will be displayed in the story, in the order in which they will be revealed.
Click this button to go to the Story Building tab in the model diagram, where you will select the model elements to include in the story.
Use these buttons to group and ungroup elements in the story. Elements that are grouped together appear at the same time in the story sequence.
Grouped items appear in color in the "Story Sequence" list. Ungrouped items appear in black.
Click this button to remove the selected item in the "Story Sequence" list from the story sequence.
Use these buttons to reorganize the story sequence by moving the selected items up or down (earlier or later) in the story sequence.
Note: You can move groups, but you cannot move individual items that are in a group. To move an item within a group, first ungroup the group, then move the item.
Click this button to add text, a graphic, a sound, or a movie to your story sequence.
When you click this button, an item named "Annotation" is inserted below the currently selected item in the list. If no item is selected, the annotation is added as the last item in the "Story Sequence" list.
Use the Move Up and Move Down buttons to move it to the correct position in the sequence.
After you add the annotation item, select the annotation's type (see below).
To specify the type for any annotation in the "Story Sequence" list, select the annotation and then select the option you want. The default annotation type is Text.
Text – Select this option to add text to your story. When you add a Text annotation, it appears in a pop-up window in the story at the point where you define in the sequence.
To specify the text to appear in the pop-up window, click the Edit Text button, and type the text in the Define Info Button dialog box.
Graphic – Select this option to add a graphic image to your story. When you add a Graphic annotation, it appears in a pop-up window in the story at the point where you define in the sequence.
To specify the graphic file to appear in the pop-up window, click the Import button, and then navigate to and select the image file.
Sound – Select this option to add a sound to your story. When you add a Sound annotation, the sound plays at the point where you define in the sequence.
To specify the sound (.WAV) file to include in the story, click the Import button, and then navigate to and select the .WAV file.
Movie – Select this option to add a movie to your story. When you add a Movie annotation, the movie plays in a pop-up window at the point where you define in the sequence
To specify the movie (.MOV) file to include in the story, click the Import button, and then navigate to and select the .MOV file.
Click this button to insert a highlight break into the story sequence.
When you insert a highlight break with the Highlight button, items that have already been revealed in the story and are marked for highlight will be highlighted to emphasize or show a relationship between the items.
Click this button to highlight the selected item during the story.
Use the Chapter options to create multiple chapters in your story. This provides an additional degree of control over the sequencing of the story.
To create a new chapter in the story, click the New button.

The number under the New button changes to the next sequential number ("2", if this is the first chapter you've created in the story). The "Story Sequence" list displays a copy of the list of entities included in the previous chapter of the story.
To move to the next or previous chapter in the story, click the up or down arrow buttons. The number between the arrows indicates the chapter you are currently viewing.

Click this button to define an algebraic relationship within a converter or flow in the story. Use this button when a story simulates partial model structures.
This button is available only when a converter or flow is selected in the "Story Sequence" list.